Here is as promised the tutorial for the Raggedy Ann apron! Now I did use a pattern for the dress and bloomers. I used the O+S Family Reunion dress but reworked a tad. I wanted a very nice dress that she could use after the dress up day and this pattern worked out nicely for that. Now onto the tutorial!
These measurements a for a toddler size 18-24 months but it should resize very easily though.
**Cut out the following**
*apron skirt, 12 1/2"x37"
*Arm straps, cut (2) 4"x18" (there will extra length for sizing later on)
*waist band, 3"x19"
*Ties, cut (2) 4"x25"
First angle cut the end of both ties, just the end though leave the end that will be attached to apron straight.
Next make a rolled hem using a serger, if you don't have a serger you can make a narrow hem but be sure to add the seam allowance to the ties before cutting. Serge all the way around except for the end that will be attached to the skirt.
Now take the apron skirt and press a hem a 1/4" the whole way around. Press under again a 1/4" the whole way around. Now stitch in place.
Onto the shoulder straps. Fold in half as to make a long narrow tub with the right sides of the fabric together. Stitch in place using a 3/8" seam allowance. Turn and press flat with the seam in the center back of strap. Now edge stitch both sides of the straps. Leave the leanght for now, we will cut them to size in a bit.
Take the waist band fabric and fold in half length ways and stitch using a 1/4" seam allowance. Turn and press with teh seam in the center back. NOw take both ends and fold the raw edges in about 1/2" and press.,**don't stitch yet!!**
Now run a gathering stitch across the top of the skirt 1 1/2"s down form the top edge of the skirt. Make a second gathering stitch 1/2" down for this.
Pin the center of the waist band to the center of the skirt. Now gather up skirt pinning in place as you go. work with the skirt until it is where you like the look of it.
Now onto the ties, taking the raw edge of one ties hand fold it up.
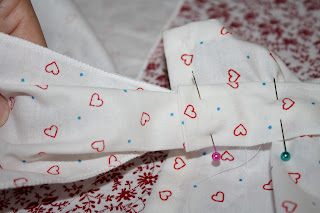
It should look something like this. Make sure that the serge edge of the ties are on the facing to the outside. Take this and place it under the waist band. Pin in place. Repeat with other tie.
This is what it should like after pinning inplace.
For the shoulder straps I placed the apron over her Raggedy Ann dress and found the center of the dress and matched it to the center of the apron. I then found where and how long I needed my straps. I then pinned the straps in place. Also make sure that the front starps are a bit angled for a better fit.
Everything is now pinned in place. Edge stitch around the entire waist band, stitching over the straps and ties twice as to hold them in a bit better. By edge stitching the waist band it sews everything right into place. That's it, the apron is done!
This is my favorite part, letting my Sweet pea try on her new creation! and oh how I love ruffly, frilly, girly things too!
Great for twirling and bouncing in. :)
And a beautiful full bow in the back, gotta love this too. ;) Enjoy!
Happy Sewing
Sharon


Your real life Raggedy Ann is just the cutest in her outfit!
ReplyDeleteI LOVE how retro it looks! Well done!
ReplyDeleteI am channelling my 70s childhood right now. This is the cutest outfit I have seen today. So precious.
ReplyDeleteThis is adorable. I loved Raggedy Ann when I was growing up.
ReplyDeleteThank you so much for your tutorial! I was able to follow it (with a little twist) and make my own apron for my Raggedy Ann for Halloween!! I can not wait until she is able to wear it!!! Thanks again so much!!!!
ReplyDeleteDiyarbakır
ReplyDeleteSamsun
Antep
Kırşehir
Konya
5PH
https://titandijital.com.tr/
ReplyDeletedenizli parça eşya taşıma
sinop parça eşya taşıma
artvin parça eşya taşıma
antep parça eşya taşıma
İHELF7
amasya evden eve nakliyat
ReplyDeleteeskişehir evden eve nakliyat
ardahan evden eve nakliyat
manisa evden eve nakliyat
karaman evden eve nakliyat
İL76T8
2A78C
ReplyDeleteAydın Şehir İçi Nakliyat
Çorlu Lojistik
Gölbaşı Fayans Ustası
Ankara Parke Ustası
Bursa Şehir İçi Nakliyat
Ordu Evden Eve Nakliyat
Çerkezköy Marangoz
Bitlis Evden Eve Nakliyat
Adıyaman Evden Eve Nakliyat
E53A3
ReplyDeleteAfyon Şehirler Arası Nakliyat
Karabük Lojistik
Karabük Evden Eve Nakliyat
Balıkesir Evden Eve Nakliyat
Manisa Lojistik
Çerkezköy Mutfak Dolabı
Bybit Güvenilir mi
Çerkezköy Evden Eve Nakliyat
Bitmart Güvenilir mi
30943
ReplyDeleteBingöl Şehir İçi Nakliyat
Çerkezköy Petek Temizleme
Kırklareli Şehir İçi Nakliyat
Yalova Şehir İçi Nakliyat
Ünye Çekici
Urfa Şehirler Arası Nakliyat
Altındağ Parke Ustası
Isparta Evden Eve Nakliyat
Bitrue Güvenilir mi
0AB18
ReplyDeletepancakeswap
dappradar
zkswap
uwulend finance
quickswap
eigenlayer
shapeshift
thorchain
yearn finance
افضل شركة تسليك مجاري بالاحساء PdnrqJmYio
ReplyDelete22780FBAF3
ReplyDeleteorganik düşmeyen takipçi
82CCECCD1D
ReplyDeletetürk takipçi twitter
CD689F6041
ReplyDeleteTelegram Madencilik Botları
Telegram Airdrop Botları
Telegram Para Kazanma Botları
Telegram Para Kazanma Grupları
Binance Hesap Açma
A9BC2ED29A
ReplyDeleteen iyi mmorpg oyunlar mobil
sms onay
mobil ödeme bozdurma
takipçi satın alma
-