Sunday, December 11, 2011

Visions Of Sugar Plums Danced in her head.....

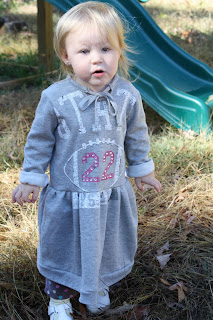
 just days before Christmas! I have had this dress cut out for quite a while but just finished it up yesterday. I am hoping to be back on sewing again with after feeling horrible for over a month. And what a great way to start up again!! :)
 This is the Oliver + S Bubble Dress pattern with the skirt reworked some to add some festive trim to the bottom. I found the trim at the fabric store and thought how great it would go with this dress. This would have to be a big favorite pattern of mine!!
What a Christmas cutie!?!
Happy Holidays!!

Sharon

Wednesday, December 7, 2011

Rock the Holidays!

Well after a month of me not being on here I am back with a fun skirt I made Sweet pea to go with her rockin' shirt! (Sorry for being gone so long!)

 A very simple drop waist skirt with to layers of fun star organza pink fabric for lots of twirling fun. She just loves this full skirt!
And a lovely Christmas pose by the tree.
 Our Christmas tree is still half done, maybe we will finish tonight. :) I have been sore and and a bit sick so no sewing for me but now that I am feeling better maybe I can still finish my long Christmas to do list in time still.
 I placed our Advent stockings on the tree this year. The boys are have fun everyday trying to find each numbered stocking. I think I will place the stocking on the tree every year now. If you would like to make the stocking here is the link to the tutorial.
They look great on the mantel too!
Happy Sewing!!

Sharon

Tuesday, November 15, 2011

A Winter Coat For Sweet pea

 I finished this coat last week but I am just now sharing it with you ladies. I used the Oliver + S Sunday Brunch jacket pattern but made some of my own changes to it. :)
 It if fully lined, inside and outside is a cozy fleece. Sweet pea just loves fleece! The coat wasn't lined before in the original pattern but was very easy to do. All I did was cut out two whole jackets out of the fleece. The front two piece of the jacket skirt was to be cut out with a rectangle slice out of it but I cut it out straight across. I then sewn up the two coats but only one with the collar then sewn them together the entire way around with leaving a 8" opening for turning. To finish it off all I had to do was stitch across the bottom of the coat skirt. Easy Peasy! Then I finished it off with some wooden buttons that is Sweet pea's FAVORITE buttons! 
Here is a look at the inside, all nice and finished. :) I am very happy with the way the coat came out but a word of warning that the button holes were a big pain to make!! I was happy to finish them but I broke a my seam riper opening up the very last button hole. But other than that it was fun to make. :)


Happy Sewing!!! And onto Christmas sewing!!

Sharon

Friday, November 11, 2011

Help! Blogger problems!

First off I want to say sorry for being "gone" all week. I was rear ended in my van early this week and have been pretty sore. My van is all tore up too. that being said I have been having a big problem with signing into blogger all this week. It won't let me sign in saying I have the wrong password even though I don't. gggrrrr. I have to reset the password every time I want to use blogger. I am getting a big head ache over this! Any one know what the heck is going on?

Sharon

Monday, November 7, 2011

A Vintage Dress

Well, not really but I love the look of vintage! This is the newest pattern From Oliver + S, Apple picking dress. A simple but lovely pattern.

 I used a lighter weight fabric for this one and added to the pattern growth tucks to the skirt and some sweet lace trim to the bottom of the skirt. I also added the lace to both sides of the button placket. I think it gives the dress that old timey look that I love.
 I just love this pattern! The look and the fit on my little growing girl. It is very easy to follow and fun to sew together. This pattern is a great new look to an old vintage one!
Happy Sewing ladies!!

Sharon

Sunday, November 6, 2011

Shirbet Pips Swinging Good Time!

 I made this dress a bit ago and I love how it turned out! It fits Sweet pea great and is so lovely on her too.
It's the perfect print for swinging in too. I used Sherbet pips, oh how I love this print!

 This is Sweet pea's new way to swing by herself. It's way more fun swinging by herself too. ;)
It is the Oliver + S pattern Puppet Show. The pattern was out of print but is now back as a PDF. The PDF can be printed at a print shop and be printed up as the full size pattern sheet, no need to tape together as a  big puzzle. I'll be sharing more on this pattern later this week.


Happy Sewing!!

Sharon

Sunday, October 30, 2011

An upcycle and Fall Fun

I had this warm cozy sweater just hanging in my closet for a couple of years just sitting until Friday. That's when I thought to myself what a great dress this would make for Sweet pea for this fall and winter! So it then became...
A nice warm cozy sweater dress! I used the O+S Jump rope dress pattern. It was super easy too! All I did was changes the colloar and left the button placket off. I love this dress in a knit as much as I do in a cotton.  
It is a bit big still but it will fit all winter long. It is a 2T and she is still wearing a 18m. Well she can still wear a 12m in her waist, lol.

This dress is wonderful for fall, great for jumping in.
Even better in fours.
I though I would share some photos of the boys too. All the kids where getting along haveing fun. That doesn't happen very offten. ;)

And what a great bunch they are!
Mr.W had to pick himself a beautiful red leaf off the dogwood tree. It is so lovley this time of year.
Add two and much more fun!
I hope your weekend is as lovley as ours!

Sharon

Friday, October 28, 2011

A gift for Baby

Looking at this little dress makes me miss tiny babies in my home! It is size 0-3m, which now seems so tiny compared to Sweet pea's 18m size. A O+S bubble dress made out of flannel fabric, completely lined with the same fabric, I had on hand here at the house. Complete with a bit of piping around the waist line.

I am a sucker for piping!

I placed the label this time on the back bodice under the blue buttons and the size tag on the inside lining of the skirt so it won't scratch baby's skin. The little one is due this next month so I thought this fabric would be wonderfully warm for the cold first couple months of life. :)

Happy Sewing and have a great weekend!!

Sharon

Wednesday, October 26, 2011

Raggedy Ann Apron Tutorial

Here is as promised the tutorial for the Raggedy Ann apron! Now I did use a pattern for the dress and bloomers. I used the O+S Family Reunion dress but reworked a tad. I wanted a very nice dress that she could use after the dress up day and this pattern worked out nicely for that. Now onto the tutorial!
These measurements a for a toddler size 18-24 months but it should resize very easily though.

**Cut out the following**
*apron skirt, 12 1/2"x37"
*Arm straps, cut (2) 4"x18" (there will extra length for sizing later on)
*waist band, 3"x19"
*Ties, cut (2) 4"x25"

First angle cut the end of both ties, just the end though leave the end that will be attached to apron straight. 
Next make a rolled hem using a serger, if you don't have a serger you can make a narrow hem but be sure to add the seam allowance to the ties before cutting. Serge all the way around except for the end that will be attached to the skirt.
Now take the apron skirt and press a hem a 1/4" the whole way around. Press under again a 1/4" the whole way around. Now stitch in place. 

Onto the shoulder straps. Fold in half as to make a long narrow tub with the right sides of the fabric together. Stitch in place using a 3/8" seam allowance. Turn and press flat with the seam in the center back of strap. Now edge stitch both sides of the straps. Leave the leanght for now, we will cut them to size in a bit.

Take the waist band fabric and fold in half length ways and stitch using a 1/4" seam allowance. Turn and press with teh seam in the center back. NOw take both ends and fold the raw edges in about 1/2" and press.,**don't stitch yet!!**

Now run a gathering stitch across the top of the skirt 1 1/2"s down form the top edge of the skirt. Make a second gathering stitch 1/2" down for this.
Pin the center of the waist band to the center of the skirt. Now gather up skirt pinning in place as you go. work with the skirt until it is where you like the look of it.
Now onto the ties, taking the raw edge of one ties hand fold it up.
It should look something like this. Make sure that the serge edge of the ties are on the facing to the outside. Take this and place it under the waist band. Pin in place. Repeat with other tie.
This is what it should like after pinning inplace.
For the shoulder straps I placed the apron over her Raggedy Ann dress and found the center of the dress and matched it to the center of the apron. I then found where and how long I needed my straps. I then pinned the straps in place. Also make sure that the front starps are a bit angled for a better fit. 
Everything is now pinned in place. Edge stitch around the entire waist band, stitching over the straps and ties twice as to hold them in a bit better. By edge stitching the waist band it sews everything right into place. That's it, the apron is done!

This is my favorite part, letting my Sweet pea try on her new creation! and oh how I love ruffly, frilly, girly things too!
Great for twirling and bouncing in. :)
And a beautiful full bow in the back, gotta love this too. ;) Enjoy!

Happy Sewing

Sharon