Thursday, August 18, 2016

Sewing For Prince C


So it has been very quite here for while. I been taking a break from sewing altogether with some leg problems that has slowed me down and then had surgery at the beginning if July.  While healing is coming slowly I have been finishing up those UFOs. First up is two Sketchbook shirts for Prince C. One is for family photos so no pictures just yet but here is one of them. I love the fall colors in this print and he loves it because it looks like southwestern to him. 


Prince C was very lacking in some tops so I made him the size 3. (I have one more finished and three more in the works) It's so hard to believe this little guy is on a size 3 already! It seams just yesterday I was sewing him a size 18 months. I did decide to get more wear out of all his clothes that I would make him several new sailboat tops to layer over his sketchbook shirts the fall and winter. He loved doing this last year so much. 


For all his Sketchbook shirts now I make them as a two pieces collar. It is a very easy mod to do as all the pieces you need are already in the pattern. I love the way the collar like this sits very nicely. 


I paired this top with his Sailboat denim pants. Another Oliver and S combo that I love. 


Hopefully within the next two weeks I will get up a tutorial on how to make this shirt with the two pieces collar. 

Until next time, 
Happy Sewing!!

Sharon 

Tuesday, May 3, 2016

Mother's Day Blog Tour, Sewing With Liesl + Co


Happy Mother's Day Early! I am happy to be apart of CBAT Mother's Day Blog Tour. Today I thought I would share you ladies a few of my favorite tops I have sewn myself. I have made these a while ago but never have taken time to blog about them or share them. 


First up is Liesl + Co Gallery Tunic made in Art Gallery Voile. This is the perfect top for summer and early spring for me. I burn so easy so this fabric is light weight enough for it to be worn as a long sleeve even in the hot summer sun. 


I do wear this top a lot as well. I love the pattern and the ease of the construction as well as the fit. I made a straight size 18. It loose fitting so I could size down but I love the breezy feel of this one so I do adore the fit as is. I am hoping to pair it with a capris this summer. 


Next up is the most worn shirt to date. It is nothing fancy but is sewn in my all time favorite Art Gallery knit fabric of mine. It reminds me of Florida and makes me smile.   I used the Liesl + CO Cappuccino Tunic in all knit. I all this tunic pattern as much as the first pattern I talked about. I have yet to make it in a woven but hope to soon. It is divine in all knit.  The fit is straight from the pattern, no mods needs. This is the second top I have made in all knit with this one. I must make a all knit dress for fall and one denim dress for fall as well. Defiantly a staple in my wardrobe! 


Be sure to visit all the blogs this week (their links won't be live until the date listed, but I encourage you to visit!): 
 5/3/16: Sharon from Sweet Pea & Pumpkins 
 5/4/16: Essence from Adventures with Bubba and Bug
5/5/16: Melissa from Rebel and Malice 
 5/6/16: Heather from All Things Katy 
 Happy Sewing and I hope you enjoy your Mother's Day!

Sharon 

Friday, March 18, 2016

Oliver and S Bubble Dress in Voile; Whimsical Fabrics Blog Tour

I am so glad to be apart of the Whimsical Fabrics Voile fabric tour! For today I picked one of my favorite patterns to sew up today, Oliver and S Bubble dress. AS this pattern goes from a size 3 months to a size 5. My little girl is now wearing the size 5 so this is also part of our size 5 project. (O+S size five project is for all those little ones outgrowing the pattern size rage, we are trying to sew one of each of these patterns before she will forever out grown it.) 


Now I adore the Bubble Dress pattern. It was one of the second batch of Oliver and S pattern that I bought. I fell in love first sew! It is so quick and easy to sew and is such a sweet dress. I will confess that I have always dreamed of sewing this dress in voile, they always seamed to be a perfect match. Now that I finally have they really are perfectly paired! 


This dress pattern is fully lined so I used the same fabrics as the inside as the outside. My daughter adores this dress so much because of the "silk" feel. She does have a beautiful silk Bubble dress as well (a gift) and this is the only dress that she has said that she loves to wear as much as that one. I had to pry it off of her when it was play time. That is the highest complement from a child I would say. 


Even her doll Grace had to have one. Lucky for that both of these are so quick to sew. I think they both will need another set very soon. (The doll is mine that I made to look just like the O+S version).


I finished both dresses with some vintage yellow velvet ribbon that was from my Great-grandmother. It makes this dress that much more special to her and I both. 


You can find both the pattern and the voile in the Whimsical Fabric shop by following the links below. Use the coupon code VOILE to save 10% off all store Voile. 


Thanks for stopping by!


Be sure to check out all the posts this week! So many different uses for Voile! 3/14: 
Larissa from Connected by a Thread 3/15: 
Denita from Hattielu Handmade 3/16: 
JaNette from Merri Poppins 3/17: 
Sharon from Sweet Pea & Pumpkins 3/18: 
Stacey from From a Box 
 You can shop voile fabrics on the Whimsical Fabric website and be sure to use VOILE for 10% off your voile order! Coupon expires Thursday, March 24th at midnight CST.

Happy Sewing!!

Sharon 

Monday, March 14, 2016

Oliver and S School Days Rain coats and a Sew Along!


Spring is here in our part of the world! I can't say how happy we all are about this. So with the warm weather is of course rainy weather as well, so we celebrated with new rain coats for my two youngest! It gets even better than this, I am teaching a sew along on this incredible Oliver and S pattern over at Whimsical Fabrics starting on the 30th of this month as well. 


First up is Prince C's coat. I used a nice weight denim for his coat with a woven cotton lining. The denim is not water proof so I bought some water proofing spray form the hunting department (thanks dad!!) and treated the fabric before I even cut it out but after I had washed the fabric first. The coat can only be spot washed after this and needs to be treated with the water proofing spray at least once a year after this. It was very easy to do really. 


I used a traditional jean color thread for all my top stitching, love this look! This is one part of the pattern I have always adored from my first time sewing this pattern is all the top stitching. I think it is what gives it it's professional look when all sewn, plus I am a sucker for top stitching. 


I find the size on this coat pattern to be loose fitting but it also so perfect for when we have to layer the heavier clothes under our coats (like out thick favorite sweaters) for the chilly days. I have found that with all of the ones we have made that each child has worn theirs for several years and I have been able to pass each coat along to another. The sizing and constriction of this coat pattern si just that wonderful! 


Price C's coat lining, it had to be deer. He loves anything to do with outdoors and nature.  I love this little boy. 


Miss Sweet pea's coat was my first laminated rain coat I have sewn, I was pleasantly surprised by this fabric!  It was such a dream use and sew with. I did use wonder clips and tissue paper in the process (and corn starch for tuning tabs, thank you Danielle!!!) but it was so easy to sew. I can promise it will not be my last time either. 


The laminated fabric top stitch very well too. Every seam was top stitched just like her brother's coat. With not being able to heat press the fabric the top stitching hold everything in place very lovely. 


Sweet pea has worn her coat several days already, like i said it rains here more than not in spring time. Both of these coats will be well worn and loved for for while. 


Now as far as the pattern difficulty, it is rated a three out of four scissors. Years ago I though it meant that this was a hard pattern to sew but even when I was newer to sewing I so surprised how easy this coat really is to make. It does have a lot of pieces and does take more hours over all to sew but it is such a satisfying sew.  I find this pattern so relaxing to make myself. It is in my top favorite patterns of all time. Every coat always finishes with such a professional look. I have never seen a bad cat sewn. (Liesl has this way with her patterns.)


Top Stitching details baby! 


The other neat part of this pattern is the inside! The coat lining is sewn with this lovely ease that makes dressing and wearing the coat so comfortable. The kids have plenty of room to move, play, and run in this coat. 


If you would like to join us in our sew long you can find more details in out Facebook group. 

The lovely Danielle has even made several lovely kits up for girls and boys in the shop.  Use the coupon code SewAlongSavings to save 10%. Follow the link below.


Of course you can use your own fabrics as well. 
I really hope your join us!! 


Happy Sewing!!


Sharon

Wednesday, February 17, 2016

Jocole Love Blog Tour; The Circle Flounce Dress


I am very happy to be apart of the Jocole Love Bog tour! Today I have sewn up a Circle Flounce Dress with matching doll dress for Sweet pea's baby doll.


From cutting out the dress to sewing it it took my a whole two hours to make both the dress for my daughter and her baby doll's matching dress. The pattern instructions are really well written and the assembly of the dress is so well done.  This is a more simple dress with a lovely look to it. Both my daughter and I really love this pattern. She wouldn't take it off even after we did photos then wore it three days row, one day she even wore it to bed! (So if you plan on sewing this dress up be sure to make two, one to wear and one for the wash, lol). 


This is a summer style dress but it layers very well and goes great with boots. We plan on using this dress and a season transition piece. With the colors and print of our fabric I am sure it will out very nicely. I really adore patterns that have more than one season to them. 


Then I had, had to make Elsa the bitty baby a dress as well. My daughter, Sweet pea, loves to have matching doll and mommy clothes so the doll pattern included in the pattern pieces was a huge added bonus for me! 


The smile on her face says it all. 


I did make one modification to the dress and that was to add buttons instead of the snaps. My girl is a button girl all the way so it had to have them. I didn't have to change the pattern in any way, i just added a interfacing to wrong side of the bodice and my buttonholes where the snap placement was. Easy Peasy!  


Over all this is a really great! 
Our Jocole Love!! 


You can find this pattern on the Jocole site at the link below. 


Thanks for stopping by!

Sharon 


Be sure to check out all of the blogs on this tour! Which is your favorite so far? 
 Feb 8- Larissa from Connected By a Thread 
 Feb 9- Tibeca from Sewing by Ti 
 Feb 10- Robin from My Little Lady & Gentleman 
 Feb 11- Patricia from Sew Far North
Feb 12- Linda from Sew Happily Ever After 
 Feb 15- Larissa from Connected by a Thread and Essence from Amazing Adventures of Bubba and Bug 
 Feb 16- Amy from Wally and Grace
Feb 17- Melissa fron Rebel & Malice and Sharon from Sweetpea & Pumpkins Feb 18- Ula from Lulu & Celeste 
 Feb 19- Teronia from Crazy Crafty Haute Mama and Cindy from Cindy Parrett.com

Friday, February 5, 2016

American Girl Inspired Knee-high socks and Tight Tutorial


I been sewing up some cute doll socks today and I thought I would share with you how to make some yourself. They are crazy easy to make and so much fun! These are all made with adult socks and knee-high women's socks. They are so much fun that I have plans on making some dress socks and a few more knee-high pairs. Well lets get started! 


1. Take the sock you are using and turn it inside out. It only takes one sock to make a pair of doll socks or leggings. This is a men's dress sock here that I am using for the doll knee-high socks. 


2. Measure down from the top of the sock 5 3/4". Cut a straight line across. If you are making a pair of dress doll socks cut this shorter, more at 3".


4. Cut up the middle of the sock to create two equal pieces. One for each doll sock. The top edge of the adult sock will become the top of the doll sock.


4. Now either sew with a zig zag stitch or your serger the bottom edge and the sides where the raw edges of the sock are at. Sew in one continuous line, curving at the corner.


5. If you are making a pair of the leggings skip step 2 but cut the sock (this needs to be a knee high adult sock to be long enough for doll stocking) right above the heel. Cut the middle of the sock just as in step 4 but stop 3 1/2" from the top edge. The top edge of the adult sock will be come the waist band of the leggings. Sew or serge all the way around in one continuous lines as before.


 Tun the socks or tights right side out and you are ready to style your dolls!


These are some fun holiday ones for St. Patti's Day. I think she will need a fun green outfit to go with them now. 

This is what the knee-highs look like with boots, they are the wrong color of boots and the wrong style but you get the picture. ;-) Now we are looking for some killer boots to go with all these great socks.


Happy Sewing!! 

Sharon 

Winter's Dance Skating Dress PDF pattern for Dolls Plus a Free Sweetheart Doll Dress pattern!


Happy Friday everyone!! 
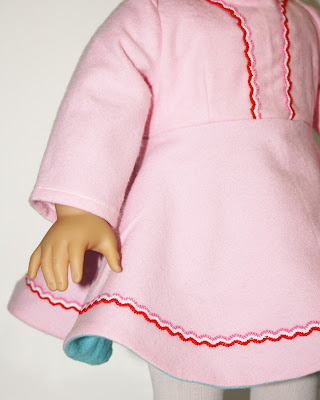
This morning my pattern Winter's Dance Skating Dress released! This PDF pattern is for both the 18" doll and the shorter baby doll style dolls, like the Bitty Baby doll.  This dress is a vintage style ice skating dress from the 1950's era.  I really love the designs from that period of time! 


The dress is fully lined and has a circle skirt that is sewn in two pieces, easy for a directional print fabric to used. The lining of the skirt "peeks" out form under the top skirt some so it is a great place to add a fun color to the dress.  The bodice of the dress has darts as well to add really lovely fit and details to the bodice. The sleeves have a slight gather to the top and the dress is finished of with some fun trim that is on the bodice and the skirt as well. The pattern includes the trim stitching guild as well. 


For the red and pink dresses I used a flannel fabric for a warm look. I like the weight the fabric has as well to help hold the skirt's shape better at the bottom. 


This pattern looks really good in a quilter's cotton as well. I even added a fun bubble trim to miss Elsa's dress. 


You can find my pattern by clicking the link below! 


You can also win a free copy of this pattern by clicking the picture link below to my Free pattern that is featured over at Whimsical Fabrics Tuesday Tutorial! The pattern is absolutely free and if you sew it up between today and next Tuesday you will be entered to win a free copy of my Winter's Dance Skating pattern!! 


This doll dress pattern is one of Sweet Pea's favorite's! I even had to sew up a pair of doll cowgirl boots to go with it. 


Happy Sewing!!

Sharon