Tuesday, October 30, 2012

My Baby Bumble Bee and 4 Months Old!

 I am so happy right now! I finished my very last costume for this year!! This costume is very special not just because it's the last one on my list but because it's the only costume that I picked out for my any of my kiddos. {Oh the joys of having older kids. ;)  } It's also baby C's first halloween. 
 
To warn you there a quite a few photos. Let's face it when it comes to our kids we can never take too many photos of them!
 For Prince C's costume I was planning on making a very simple owl costume this year but one night as I was sleeping I dreamed of this very little baby bumble bee. When I woke up I knew it was perfect for my baby for his very first halloween!
 I used the John & Suazzne's bubble pattern for the main part of his costume. I have used this pattern before for his newborn summer clothes. I love the pattern and it's wonderful cute!
 
I made 9 month size, boy has little boy grown! I cut yellow and grey fabric strips in 1 1/2" width then sewn them all together using a 1/4" seam allowance. I then cut the pattern out. The only real changes that I made to the bubble pattern was to leave the peter pan collar off and replace it with a simple bias collar. I waned it look more like a bee and less of a dress outfit. Well I also added wings and a little stinger to it too. :)
 His bee hat was from The Oliver + S sewing book Little Things to Sew. It the little lamb hat with little antennas instead. I made yoyo's for teh ends stuffed with pompoms to keep a nice round shape and there is pipe cleaners int the center of the bias to keep them up in the air. The hat took me about an hour total of sewing time so not bad at all.
 On top of halloween being tomorrow it's also prince C's 4 months "birthday" today! I can't believe he is already 4 months.
 The costume was a big hit with all the kids too. I "flew" him around the house "stinging" his older brothers with his little bumble bee stinger. I not sure who laughed harder, prince C or his brothers! Mr J laughed so hard he started to cry. :)
 The wings I layerd them with quilt batting in the center to give them more of a 3D look but still be able to wear in his car seat.
I am very happy how this one turned out, all of them really. Most of all I am glad to be done I now I am taking a break from sewing for the rest of the week!
 
 
Happy Halloween!
 
 
Sharon

Monday, October 29, 2012

Wizard Costume!

 My oldest is all about video games. When he isn't playing them he is reading about them and taking about them and designing his own games. What kind of costume to make a kid like this, well a wizard of course! Dad found the perfect wizard costume when Hobby Lobby had it's $.99 pattern sale.
 I did follow the pattern to a tee this time. (I had no time to make any changes!) It was quick and not bad to sew. The cape was yards and yards of fabric though. My mom sent us two old black sheets that worked out wonderfully for an old wizard cape. He didn't want anything that looked new if he was going to be an old wizard. ;) It was however a pain to sew all this fabric!!
 I made his staff using an old curtain rod, a plastic Christmas ornament, leather string and hot glue. The plastic "ball" comes off to add a glow stick to make his staff glow in the dark. It's very hard to see here but it is glowing. This is his favorite part of his costume!
 I love the cape of his. It fits me pretty good but needs some lenght, in a pale blue this would be a perfect fairy godmother costume for a Cinderella theme next year. ;)
 The under clothes. I did make the pants with the Oliver + S Sketchbook pattern that way he can use them after Halloween. You can never go wrong with Oliver + S!
 If you look very close at the bottom picture you an see my little wizard face. Can you see it?
One more costume to go! I already started it and will not stop tonight until it is done. It will be a very long night.
 
 
I am thinking and praying for all in the path of Sandy. Stay safe!
 
 
Happy Sewing!
 
Sharon

Sunday, October 28, 2012

A Hiccup Viking Costume for Our Hiccup

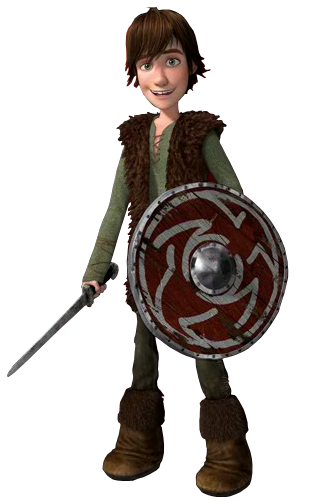
This guy here is the tiny viking and the inspiration for Mr W costume this year. W loves the books and the movie already, then the came the show. W loves him so much because they are bit alike. See W is our little Hiccup too. {I am sure too that he would love to have a dragon for pet but it's soo not happening. ;) }
 I uesd the Oliver + S Explorer vest from The Little Things To Sew book for his furry viking vest. I used the large size and added 2" to the length and changed the top of the arms to that Of the Oliver +S bubble dress to give it a bit more flare at the tops. I used the sketchbook pants pattern for the bottoms. I added a leather side lacing and a fur cuff to look like Hiccups boots.I though this would be way easier to keep up with than have a slip over for his shoes. I did used a wizard McCall's pattern for his top though. I did take in the sleeves a ton.  I used the same lacing for the top as I did for teh pants. I even sewn on the lacing on the sleeves ends.
 He found the shield at Hobby Lobbby. I think it works perfectly. Bonus, we didn't have to worry about making one!
 Some things I added for my Hiccup was two inside pockets for his eels to ward of any unwanted dragons. (this is very important I have been told)
 Here is the side of the pants lacing.
 Well I have three very happy kids and two costumes to finish for the oldest and the baby.  I only hope they are as happy with thier costumes as the others have been. I also hope I finish by tomorrow night!
Happy Sewing!!
 
Sharon

Thursday, October 25, 2012

Ninjago llyod Costume of a Little Boy's Dreams!

 My little six year son wanted to this Ninja here from Ninjago. His name is Llyod. If you ask him he will tell you he wants to be Llyod more than anything for Halloween. (Yes, I did have to ask the first time who in the world is Lloyd??) He didn't think that I could pull off the costume he wanted at first. Well he isn't douting any more!
 Doesn't he look to be in full Ninja mode here? ;)
 
I used Oliver + S pattern Sleepover Pajamas for his costume. It worked out very nicely for this too. I used all flannel fabric for the main part to make it nice and warm for a chilly night of candy collecting. My thinking is that he can used these for pj's after Halloween as well.
 I made what seems a ton of shiny gold things to sew on this ninja outfit everywhere. It very pretty to sew. It sparkled in the light of my sewing machine.  hehehehe But aside from joking this thing took what seemed like forever to sew. It was started on Sunday and I just finished very late last.
 It was totally worth it too! I had fun making this costume as much as he loves.
 
I made a simple belt and made the pattern for the shoulder plates and the hood. It was not not as hard as I thought it would be. Just a ton of sewing. I am glad to be done!
No time for me to rest either. I am on to the next costume for my 8 year boy. Until then...
 
 
Happy sewing!!
 
Sharon


Visit thecsiproject.com

Tuesday, October 23, 2012

A Periwinkle Pint Size Plus a mini tutorial

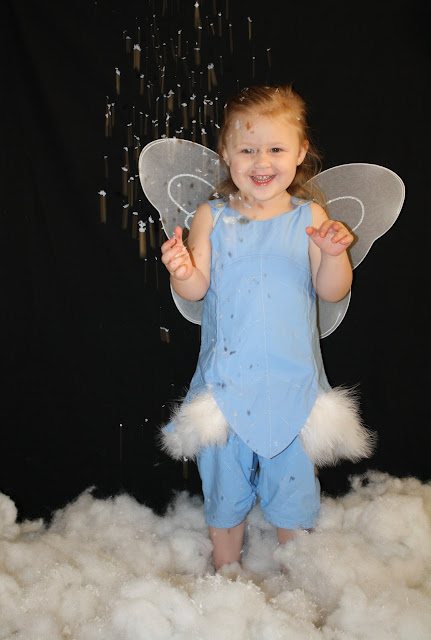
 I am not crazy for (or even really like)  Halloween but this year Sweet pea requested her very first costume. This has made a big different this year for me. Well all the big kiddos requested mama made costumes this year. (yippy!!) After watching hours, yes hours, of Secret of the wings previews she decided she wanted to be "the winter fairy for Christmas". I am sure she meant Halloween. I hope.
 I didn't make her just like Periwinkles but as close as I could. I did want shoulder straps so this would be a very appropriate toddler clothes, nothing falling off. The craft store had feathers just like the ones on her dress but they were $4 each I would need seven. So after a quick run through the store I found in the hair accessorise department I found a strip of white feathers sewn together for $3, perfect! (it is a costume after all)
 I went to my must trusted Oliver + S patterns to make the top and bottoms for outfit. I just love these patterns! I used the Tea Party dress for her top, size 2T and the Sail boat pants for her bottoms.
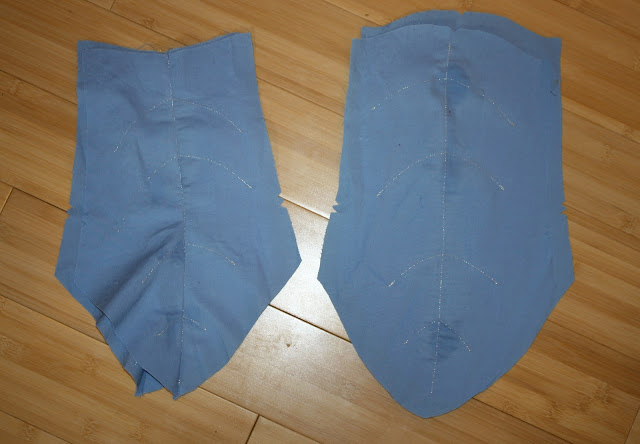
 For the top I made the yoke just as is in the pattern but I used a shiny silver thread for the top stitching on the yoke. For the bottom "leaves" I traced the pattern pieces first.
 I then marked on the center panel 1/2" up on the fold side then marked 5" up on the other side. I then drew a strait line between these two marks. I then made a more "leaf" line (the purple line) for a cutting mark.
 
On the side panel I marked 5" up on the inside and then 1/2" on the outside. I made a straight line between the two then made a more leaf line, in purple, for cutting.  
 I cut out four center pattern pieces and 8 outer pattern pieces. I made the skirt fully lined. It made it easier to make the leaves out of the skirt panels.
 I then sewn together all the outter panels together the main and the lining ones as well. I them pressed them all open. Next I top stitched the silver viens of the leaves on all the outer leaves pattern pieces.
 I then sewn all the "leaves" together with the main and lining ones. To attach the skirt I sewn them as in Nicole's tutorail fora lined Tea party dres found here. This way I was able to keep the leave edges as was. i sewn them with a 1/2" hem and was sure to trim the leave points and where the leaves meet very well. I did top stitch the hem after I turned and presses the leave edges too.
 
 
To finish the dress, I cut the feather strip in half then even placed it on either side of the dress. I was very lucky beacuse it was just the right length of feathers I needed for the top.
 For the pants I top stitched the silver leaf viens as well before finish sewing the pants together, then fished the hem with a leaf stitch design. I used elastic on the inside of the pants sean to give the pants bottom a more leaf shape. All the buttons are snowflakes, perfect match. :)
 I had the most fun sewing this and I am having even more fun watching her"flying"around the house playing fairies.
 Right now she is watching the Secrect of the Fairies and dressed to matched. I think I did well by her. What more could a mommy ask?
 I love my little snow fairy!
Happy Sewing!!
 
Sharon

Saturday, October 20, 2012

Periwinkle Fairy Costume Preview


A bit of a preview of what I am working on, costumes for fall fun. Sweet pea wanted to be the new winter fairy from Tinkerbell's movie Periwinkle. While her outfit is very pretty I wanted a bit more "top" to the top.I used Oliver + S patterns for this with some mods to them. Easy peasy!

 I used kona Cotton fabric in a light pretty blue and stitched all the leave veins with shiny silver thread for a frosted look. It's very hard to the here but the pants and the dress both have been made with the "leaves". When I take action shots of this you'll be able to see them better.
 Here is the back of the top, yep feathers the whole way around. I used eye and hooks for the feather strip (found at Hobby Lobby) so that I can take them off for washing. I am sure with my toddler that it will need washing!
To finish the top and the pants off I used snowflake buttons. (you can see better here the silver thread stitching) Sweet pea is very happy with her costume and she flew  ran around the house. Next I am making her an under shirt for the chilly evening's we are having here. One down four to go!
 
 
Happy Sewing!!
 
Sharon

Monday, October 15, 2012

After School Fun!

 With the cold weather coming and chilly morning we are already having I had to make Sweet pea some new pants and tops. I have wanted to make the Oliver + S After School pattern forever for her. (I bought it last year) I am sorry that I didn't make it before now.
 It such a fun pattern to sew with too. The top comes together very quickly and the pants have these ever so cute ruffle on the front and back.I just love the ruffles on these pants! I also made this pattern for baby C too. The pattern works great for girls and boys both so big bonus!
 I love those tiny back pockets too.

The pants fit  really well, the top is a bit big not bad.  It nice and roomy for play time. I did leave the pants a bit long. My though is that I know she is tall and she will still keep growing so these will fit longer than a second. The pattern was easy to follow too. Everything I have come to love about the Oliver + S patterns. You can never go wrong with them!
 All the fabric is from my grandma. She found it at Joann's. The top fabric and brown pants are all left overs from the teddy bear jumper I made her the other day.  Even the tiny pink buttons are from my grandma. :)
 
So what do you think, does Sweet pea likes her new clothes? ;)
Happy Sewing!
 
 
Sharon