From our family to yours, have a very Merry Christmas and Happy New Year!! See everyone after the holidays!!
Sharon
Tuesday, December 21, 2010
Sunday, December 19, 2010
Wrap Around Dress
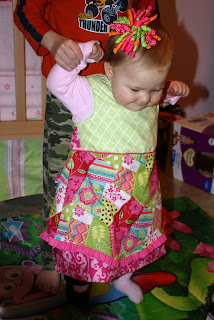
I have been wanting to make Sweet pea a wrap around dress and this fabric look like it was made to be a wrap around dress. While making her New Years dress I figured out how to make this little number. Yes, I did make this pattern too. :) I am having so much fun making her my own designed dresses! There will be a tutorial on this one after the holidays!
You can't really tell, but this fabric has a sheen to it, perfect for spring but I couldn't wait to make it! lol With the way this dress is made it should fit much longer than a more fitted dress. It has a fully lined bodice which makes it more comfy to wear. It also ties on the inside and then the sash ties wrap around to the back for a big bow.
This dress went together very easy and quickly, I made it in about 2 hours last night while the kids where sleeping.
I also made her a matching diaper cover. Too cute!
Here is what it looks like on the inside of the front, you can't see the small tie on inside though, sorry.
Remember I told you that she tries to run off now every time I try to take her picture. I placed her on a stool hoping it would slow her down, it really didn't work, lol.
"How's this mommy?!?" My silly little girl, this is my favorite picture of her.
"Now I am done, see you later!"
Happy sewing!


Friday, December 17, 2010
Homemade Oreos and Teddy Bears
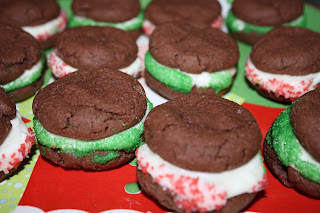
Last week over at Craftiness is not optional she posted this recipe on homemade peppermint oreos. They are soo yummy and easy to make! Click over HERE for the recipe.
Here are our cookies, they didn't last very long though! We will be making more of these for Santa (if they last that long). Even Sweet pea loved them, she would say yum yum and point to who ever had a cookie in their hand.
My Aunt Fran sent these wonderful teddy bears to my sons this past week, Sweet pea got a lovely homemade dolly too. Sweet pea just loves them! She played with them for a long time on the cough.
The teddy bears tasted yummy too! She is still trying to them for the boys, lol.
Have a great weekend!
Thursday, December 16, 2010
New Years Party Dress!
With Christmas coming up very soon I wanted to go ahead a make Sweet pea her New Years Eve dress. It took longer to make this dress than the others due to a wrapped hand. I fell Tuesday and hurt it pretty good, but thank God it isn't broke (it only took 3 hours after the Xray to tell me this). My whole hand is swollen up and bruised. Any way back to her new dress! :)
I made the pattern myself. I seen a pattern on a another blog sight with a bottom close to this, just loved it! The top I wanted to make look like a wrap around dress but I wanted buttons down the back of the bodice. I found the fabric at Hobby Lobby, the busy flower print was in the remnants bin so I got it for a steal! The fabric inspired me to make this dress!
Sweet pea was trying her hardest to run away so I had big brother help keep her still, well somewhat still, to take her picture. She kicked off her shoe in her attempts to run away, he he.
I put buttons down the back of the bodice with a sash tie back. The dress has pipping going around the whole waist too.
What you think? Not bad for a one armed gal. ;)


Tuesday, December 14, 2010
Boy Fleece Scarf
I wanted to make all the little boys in our family a scarf for Christmas but wasn't sure how I was going to make them, but on a trip to Hobby Lobby I seen remnants of fleece in the bin and light went off! I bought 3 bundles and because they are remnants the are half priced so it didn't cost hardly a thing to make 5 scarves. I had just enough with no left over fabric.
I cut the fabric 13"x the lenght of the fabric all the way down. I then fold it in half and sewn it together with leaving a 4" space opening for turning. I then hand stitched it up. Very quick and easy! The boys just love them, super soft and very warm.

Happy Sewing!
I cut the fabric 13"x the lenght of the fabric all the way down. I then fold it in half and sewn it together with leaving a 4" space opening for turning. I then hand stitched it up. Very quick and easy! The boys just love them, super soft and very warm.

Happy Sewing!
Monday, December 13, 2010
Keepsake Christmas Bib Tutorial
I wanted to make Sweet pea a special Christmas bib for this is her first Christmas. I have seen the foot and hand print reindeer and though oh how cute to put this onto a bib.
Supplies needed:
White fabric
brown scrap fabric, two different browns
fusible interfacing
heat and bond
green fabric cut 2" down the whole length of the fabric
baby rick rack
2 black buttons, one green button
ribbon
thread
Velcro
***sew in a 1/4" seam allowance***

To start off trace your baby's foot and hands, this was hard for me because my little girl wouldn't sit still ;) .Next trace a bib onto the white fabric adding a 1/4" seam allowance. I also added about a 1/2" to the sides to make room for the antlers. Cut out and add the fusible interfacing to the front side of the bib.
Step 2: Add the heat and bond to the back of bothy brown fabric and cut out one foot with the lighter brown and two hands with the darker brown. Also cut out a small oval for the nose out of the darker fabric.
Step 3: First iron on the foot for the reindeer's face to the front side of the bib (with the interfacing on it). Then stitch around as close to the edge as you can. Then iron on the hand antlers and stitch around those too. Then iron the nose and stitch the same as the face and antlers. This is what it should look like.
Step 4:Fold the 2" piece of fabric in half and press.
Sew a gathering stitch down one side of the fabric.
Step 5: Mark the center of the bib bottom and the center of the fabric piece and pin in place. Gather both sides, pinning as you go.
Next place the back of the bib on the right side of the front of the bib. pin around the top of the bib first then with starting on the bottom center move the pins to the top side of bib where you are working, pining all three layers into place.
Step 6: Sew around with leaving a 3 1/3" opening for turning. Clip around curve in the neck area then turn and press.
This is what it will look like after turing and pressing.
Step 7: To attach the rick rack, stitch close to the edge to close up the opening and the whole way around.
Step 8: To finish the bib, add the bow to deer and the button eyes and the velcro to the straps. I added a button to the back over where the Velcro is attached. That's it, all done!
For a baby boy bib you can leave the ruffle off and change the rick rack color to red and add a bow tie at the reindeer's neck.
Here is the happy little girl wearing her new bib. (I noticed the hand print on the wall after I took her picture, lol, it is all cleaned off now) She was trying to scoot away from me so I had a hard time taking her picture, too much to do to be sitting still!
Happyy Sewing!
linking up to


Teacher's Gift: Part #3
For the final sewn gift for my sons' teachers I made them quilted coasters. I used some of my favorite scrap pieces of fabric I had at the house. I made a four patch with lattice around. I cut out a piece of fabric and warm and natural the same size as the front, stitched them together and turned, then quilted them. 
I just love the stitching on the back. Now all I will have to do is cook the gingerbread cookies and fill the stockings.
Happy Sewing!

I just love the stitching on the back. Now all I will have to do is cook the gingerbread cookies and fill the stockings.
Happy Sewing!
Saturday, December 11, 2010
Teacher's gift: Part 2 coffee cozies
Yesterday I made the coffee cozies to go into the stockings for my boys' teachers. I have seen them on other blogs but not sure where so I made a tutorial on them.
You will need:
fabric for the front and lining, just scraps will be enough
warm and natural for inside
elastic hair band
button and thread
***sew with a 1/4" seam allowance***
Step 1; Take a paper coffee band and trace for the pattern, add a 1/4" seam allowance all the way around. Also add a 1/2" to the pattern at the right end of the pattern. On the left side of the pattern mark "place on fold" as in picture.
Step 2; cut out warm and natural, front fabric and lining fabric.
Step 3; layer the fabric, front fabric first, lining fabric in the middle and warm and natural on top. Now place the elastic hair band between front and lining fabric, pin in place (be sure to pin on the top of the stack and not in the middle as in my picture, I did this so you can see where the elastic band is to go.)
Step 4; sew around with leaving a 3" space open at the bottom middle for turning. Clip the extra off the corners (this is to make sharper corners after turned,) turn and press.
Step 5; stitch the opening closed and the whole way around as close the the edge as you can.
Step 6; sew the button on. I placed my on a cup to see where the button needed to go. There you have a quick and easy gift!
Happy Sewing!
![]()
 src="http://hadfield.smugmug.com/photos/825895175_xmTVA-O.jpg" />
You will need:
fabric for the front and lining, just scraps will be enough
warm and natural for inside
elastic hair band
button and thread
***sew with a 1/4" seam allowance***
Step 1; Take a paper coffee band and trace for the pattern, add a 1/4" seam allowance all the way around. Also add a 1/2" to the pattern at the right end of the pattern. On the left side of the pattern mark "place on fold" as in picture.
Step 2; cut out warm and natural, front fabric and lining fabric.
Step 3; layer the fabric, front fabric first, lining fabric in the middle and warm and natural on top. Now place the elastic hair band between front and lining fabric, pin in place (be sure to pin on the top of the stack and not in the middle as in my picture, I did this so you can see where the elastic band is to go.)
Step 4; sew around with leaving a 3" space open at the bottom middle for turning. Clip the extra off the corners (this is to make sharper corners after turned,) turn and press.
Step 5; stitch the opening closed and the whole way around as close the the edge as you can.
Step 6; sew the button on. I placed my on a cup to see where the button needed to go. There you have a quick and easy gift!
Happy Sewing!
 src="http://hadfield.smugmug.com/photos/825895175_xmTVA-O.jpg" />
Subscribe to:
Posts (Atom)


